Showing posts with label Tips And Tricks. Show all posts

How to Remove the Babylon Toolbar

Saturday, 27 April 2013

The Babylon Toolbar is an Internet Explorer add-on application that allows you to type foreign words in the given space and translate them to any language. When you install the Babylon 7 program, the Babylon Toolbar embeds on your Web browser. The Babylon Toolbar allows you to perform translations without having to navigate to the Babylon homepage. If you do not use it or need it, you can uninstall the Babylon Toolbar.

Instructions

    • 1
      Right-click the Babylon icon on the lower right of your screen next to the system clock and click "Exit." Click "Yes" to confirm.
    • 2
      Click the Windows "Start" menu, type "appwiz.cpl" in the Search field and press "Enter." This will bring you to the programs window that displays programs and applications installed on your computer.
    • 3
      Scroll through the programs folder and click "Babylon Toolbar." Click "Uninstall" and click "Yes" to confirm the uninstall process.
    • 4
      Click "Start," select "Computer" and open the "Local Disk C:" drive. Open the "Programs Files" folder.
    • 5
      Right-click the Babylon folder it and click "Delete." Click "Yes" to confirm your choice. Empty the "Recycle Bin."
Continue Reading | comments

How To Remove Your Number From TrueCaller App


Remove Your Number From TrueCaller [ How To ]
Truecaller is a great service to find out the information about the unknown numbers. You can actually figure out from which location the call was from and who is the owner of that number.
Truecaller was founded in 2009 which is basically a global phone directory. You can use truecaller through web and they have application for almost every platform. You can download truecaller for Android, iPhone, Blackberry, Windows Phone and Symbion for Nokia mobiles.  It is very convenient to find the unknown numbers without any trouble. If you have an account with their data base enhance the service by sharing your contacts. We create a collaborative dynamic database that is always evolving.
Today we are going to share a short tip which can be used to remove your number from truecaller directory. It is very simple and can be done in minutes.
If you are curious about how truecaller works ? We would like to recommend you watching the official video of TrueCaller

Truecaller – How it Works ?

Remove Your Number From TrueCaller


For removing the your number from Truecaller all you have to do is go to the truecaller unlist service and enter you number. It can take upto 24 hours to completely implement. So you have to be patient .

Step 1 - 
To remove your number from truecaller simple follow the link give below
You have to provide the full number with the country code.
 Step 2 - 
Now on the unlisting page select the country and then fill your number . It will ask you to fill the captcha and then click on the blue mail button.
After you click that button it will show a message regarding to your number unlisting. As mentioned earlier this change can take upto 24 hours.
You are done. You have successfully unlisted your number from truecaller. 
Continue Reading | comments

Gmail Keyboard Shortcuts

Thursday, 25 August 2011

To operate Gmail from the keyboard,
  • make sure keyboard shortcuts are enabled for Gmail
and use the following shortcuts. Typically, you only have to press the stated key (no Ctrl, Alt or Command key required).

In the Message List

  • Enter or o: Open the currently focused (as indicated by the black arrow) conversation
    • Shift-Enter or Shift-O: Open the current conversation in a new browser window
  • x: Check or uncheck a conversation
  • j: Go down to the previous conversation
  • k: Go up to the next conversation
  • h: Get a preview of the currently focused conversation (with Message Sneak Peek enabled)
  • u: Refresh the mailbox or label (checking for new messages)
  • s: Mark the currently focused conversation with a star
  • * (Shift-8) followed by
    • a: Check all visible conversations in the current view
    • n: Uncheck all visible conversations
    • r: Check read, visible conversations
    • u: Check unread, visible conversations
    • s: Check starred visible conversations
    • t: Check visible conversations not starred

With Messages Checked in a Mailbox or Label

  • y: Archive the conversation (if in the Inbox) or remove the current label (if in a label's view)
  • e: Archive the conversation (no matter the view)
  • # (Shift-3): Delete the conversation
  • ! (Shift-1): Mark the conversation as spam
  • + (Shift-=, but = alone works as well): Mark the conversation as important
  • -: Mark the conversation as not important
  • l: Open the Labels menu to add or remove labels
  • v: Open the Move to menu, adding a label and archiving the conversation
  • Shift-U: Mark the conversation unread
  • Shift-I: Mark the conversation read
  • Shift-T: Create a new task linked to the conversation (with Tasks enabled)
  • m: Mute the conversation
    • Future messages in the same thread will go to the All Mail archive straight away bypassing your Gmail Inbox unless your email address is in the To: or Cc: line.

While Viewing a Conversation

  • y: Archive the conversation (if in the Inbox) or remove the current label (if in a label's view)
  • e: Archive the conversation (no matter the view)
  • # (Shift-3): Delete the conversation
  • r: Reply to the sender only
    • Shift-R: Start your reply in a new browser window
  • a: Reply to the sender and all recipients beside yourself
    • Shift-A: Start your reply to all in a new browser window
  • f: Forward the conversation
    • Shift-F: Start your forward in a new browser window
  • ! (Shift-1): Mark the conversation as spam
  • + (Shift-=; or just =): Mark the conversation as important
  • -: Mark the conversation as not important
  • s: Mark the conversation with a star
  • l: Open the Labels menu to add or remove labels
  • v: Open the Move to menu, adding a label and archiving the conversation
  • u: Return to the message list
  • x: Return to the message list checking or unchecking the current conversation
  • Shift-U: Mark the conversation unread and return to the message list
  • [: Archive the conversation and open the (chronologically) previous conversation from the message list immediately
  • ]: Archive the conversation and open the next conversation from the message list
  • Shift-T: Create a new task linked to the conversation (with Tasks enabled)
  • m: Mute the conversation
  • Shift-N: Update the conversation (when Gmail indicates a new email has arrived that belongs to the current thread)
  • n: Move the cursor to the next message in the currently open conversation
    • Open a message by pressing Enter after targeting it with the black arrow cursor.
    • In a thread encompassing many messages, move the cursor just above the last message whose tab shows the sender, then press Enter to show all message tabs for navigation.

While Composing a Message

  • Tab followed by Enter: Send (under Windows)
  • Ctrl-S: Save the message as a draft (while composing)

In Gmail Tasks

  • Enter: Create a new task above (cursor at the beginning of the current task) or below the current one
  • Tab: Indent the task, making it a sub-task
  • Shift-Tab: Move the task to the left, promoting it up the task ladder (from sub-task to top level task, for example)
  • Ctrl-Up (Windows, Linux) or Command-Up: Move the current task (and its sub-tasks) up
  • Ctrl-Down (Windows, Linux) or Command-Down: Move the current task (and its sub-tasks) down
  • Shift-Enter: Open the current task's details
  • Backspace (in an empty task title; delete the title first): Delete the current task
  • Esc: Close Gmail Tasks
  • Shift-Esc: Switch the input focus to the main Gmail window

Anywhere in Gmail

  • z: Undo the last action if possible (i.e. an Undo link appeared in the yellow status bar near the top)
  • c: Start composing a new message
    • Shift-C: Start a new message in a new browser window
  • d: Start composing a new message with the Cc: field added.
  • b: Start composing a new message with the Cc: and Bcc: fields added.
  • . (dot): Open the More Actions menu
  • g followed by
    • i: Open the standard inbox (Priority Inbox or Inbox)
    • c: Open Contacts
    • d: Open Drafts
    • s: Open Starred
    • t: Open Sent Mail
    • a: Open your All Mail archive
    • k: Open Tasks (with Tasks enabled)
    • l: Open any label (except in Google Buzz)
    • p: Open the phone dial
    • /: Focus the Web Search field (with Google Search enabled)
    • w: Create a new Google Docs document (with Create a Document enabled)
  • / (forward slash): Move input focus to the Search Mail box
  • q: Go to the chat box's Search field
  • ?: Show a keyboard shortcut reference sheet
Continue Reading | comments

Did someone Used Your Pc In Your Absence

Saturday, 20 August 2011

check out if someone used ur pc in ur absence or not !!!!

Go to :

"start > run >eventvwr.msc"

Events are stored in three log files: Application, Security, and System. These logs can be reviewed and archived.
For our purposes we want the System log. Click on "System" in the left-hand column for a list of events.

Look for a date and time when you weren't home and your computer should have been off.

double click on the eg: info n it will show u the detail.

You can also use this log to see how long someone was on the computer.

Just look at the time the computer was turned on and off for that day.
Continue Reading | comments

How To Abort The Mistaken Shutdown Operation In Windows

You’ve mistakenly pressed shutdown button on your pc or you mistakenly choose restart. In such condition, how to abort the current shutdown operation?

we’ll create an emergency abort shutdown icon. Then you’ll just have to double click on it to abort shutdown.

To abort shutdown, immediately after initiating shutdown we will have to use "shutdown-a" ...let's see how

STEPS:-

1) Right click on the blank area of your desktop and choose New>Shortcut

2) In input box of “type the location of the item” copy or type the following command as shown in image below:

 3) Give it your own shortcut name. (I named it Emergency)


click on finish button

4)  You’ll have your emergency abort shutdown icon ready. Now to easily recognize it, we’ll give it a unique icon and place it at the unique place (i.e. apart from other icons in desktop) Right click on the Emergency icon that you just created, go to Properties and click on Change icon button at the bottom.
5)  Then choose your unique icon and click OK , place it wherever u want....all done..enjoy now
Continue Reading | comments

Make Folder With Invisible Name

Make Folder With Invisible Name

1.Right click on the folder that you wish to make the name invisible.

2.Click "Rename".

3.Hold down the "Alt" key and type,"0160"

Note: For this to work you have to user the number pad on the right hand side of your keyboard.

4.Click outside the folder

Done !!!
Continue Reading | comments

Make USB storage devices totally useless without your permission

I am going to show you how you can make USB storage devices totally useless without your permission.

To block all the storage device in your Windows, run registry editor by typing regedit in RUN command.
In the registry editor, at left side navigation pane, navigate to following location:

HKEY_LOCAL_MACHINE > SYSTEM > CurrentControlSet > Services > USBSTOR

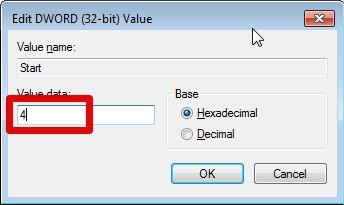
Now at the right side double click on START.


To block USB storage Medias, change the value data to 4.


If you want to unblock USB storage Medias just navigate to the same location and change th value data to 3.

that's all....make ur PC safe....more tricks to come....
Continue Reading | comments

15 Features Of VLC Player That You Probably Don’t Know About

VLC Player being the most celebrated open source media player is also ranked as the best among thousands of media players available out there.The latest version unleashed new horizons for controlling, managing, & customizing media files regardless of any format they belongs to. For novices, it come across as only a “Media Player” but the fact is, it empowers users with multitude of playback, recording, and streaming options. What makes it stand out is minimalistic & simple IDE, smooth playback, capacitating users with multiple file format support and much more. From the day VideoLAN dev team gushed forth VLC Player for the general public, we have seen a mass switch from other eminent media players.

Lets glance at the most overlooked features it offer.
Extravagant Video Effects

VLC include numerous aesthetic video effects, such as; Image adjustment, Transformation, Video cropping, Geometrical view & magnification, Video rotation, Color fun, and Image modification. You can access these video features through Extended Settings from main VLC IDE. Switching to Video Effects tab will show up these features in numerous tabs.

1) Basic Image Adjustments


VLC provides basic image adjustment options. Under Basic tab, you can play around with various color adjustments; Hue, Contrast, Brightness, Gamma, etc. On adjusting the color, you can view changes in realtime. Color adjustment options can also be very helpful especially when you are playing a video, having noise, glitches and lacks normal color pattern.

2) Video Sharpness effect
Apart from basic image adjustment options, there is another much demanded feature which will let you adjust video sharpness up to the acme of clarity. Under Basic tab, enable Sharpen option and adjust the sigma control as required. It will show you the changes in realtime so you can promptly adjust sharpness accordingly.

Scrutinize the wonderful sharp effect it produced in the video shown below.

3) Transforming to different angles
The Transform option allows you to rotate video by multiple degrees. Enabling Transform option would activate the video rotation feature. It offers rotation in 90,180, and 270 degrees. This comes useful if you have a video that you recorded via the camcorder in a different angle.


4) Video magnification/Zoom in & out
Another intriguing feature is Video Magnification. Under Geometry tab, enable Magnification/Zoom option, to let it zoom in/out the video. You will see a small window at top left corner with main magnification control. Fill in the triangle by clicking it to zoom into the video. To view the desired video portion, move the square capturing screen across the box.

 5) Video Rotation
With an excellent rotation feature, you can rotate the video in any direction. Enable Rotation option, and start moving the rotary control in circle.

6) Add a bit fun with Puzzle Game
The moment you hit Puzzle game option, it would turn the video into puzzling pieces. Enter number of columns & rows in which you need to solve out video puzzle. It divides the video into specified chunks on the screen.
 
Under Color fun tab, you can play around with colors, there is absolutely no list of colors to select from. You can write color code to introduce it in the video. Apart from this, through Color Extraction option, you can enter a specific color code to extract it from the video.

7) Panoramic view (Optimal for Muti-Screen)
Vout/Overlay is another superb feature, allowing video junkies to spread the video on the desktop wall in multiple windows. In this way, you can individually handle, manage and change the position of the video parts separated in windows. To make this effect look awesome, try it on a large HD TV or projector. On the left side enabling Add text option would add the text in each window.


8) Adding Logo
Overlaying logo option comes in handy, you can easily insert a logo (PNG/JPG format) in the video as a watermark. It also helps in overlaying existing logo with an image. To make use of this feature, under Logo tab, specify the full path of image where it is residing, adjust transparency control and allocate the position. The importance of this feature is that you can add the company logo while giving a video presentation.


9) Synchronization
Kudos to VLC for bringing up sync feature, those who haven’t used it yet, really missed out an important one. Under Synchronization tab, you can manually manage the A/V (Audio/video) sync and deal with them by adjusting the time. Most of the converted videos lacks A/V sync primarily because of change in FPS (Frames Per Second), this actually invokes the problem of either video or audio lagging behind. For adjusting the A/V sync problem, change the values in Advance of audio over video input pane, positive value refers to as video is lagging behind and conversely is the case with negative values which refers to as audio lagging behind.

Right beneath A/V sync settings, you will find Subtitles settings, to make subtitle properly sync with video, i.e, appears on right time. Adjust the timing in a way as defined in aforementioned criteria for A/V sync, positive values refers to subtitles showing up ahead of video. At the bottom, you can change subtitles speed. It may happen sometimes, on downloading subtitles from different source, or from different author, the speed (FPS) is not aligned with the video FPS, i.e, video running on different FPS and conversely subtitles FPS differs. To cope up with this problem, speeding of the subtitles option helps amazingly.

10) Record Webcam Video
Recording video from a webcam is another awesome feature VLC offers. It automatically populates the list of devices attached with your system. To record a video from the Webcam, under Media menu, click Capture Device. From Video device name, select the webcam device and click Play. It will turn on the webcam, from it’s main IDE, you can start recording the video instantly

11) Bookmarking media
Now this must be surprising to most users. Did you know that you can bookmark as well? VLC allow users to bookmark media files, whether you are playing it from local media, or streaming it from any remote location. You can instantly bookmark the media file and access it anytime later.


12) Advance Open File
Bluray DVD discs & rips comes with separate audio channels for giving the real effect of surrounded sound. Unlike others, VLC features Advance Open File option, which allows you to open a video file along with the separate audio file (if existed). You will find rip-less video synchronization with the external audio file ‘phenomenal’. Next time, you are planning on playing Bluray rip, take a whir of this feature.

13) Take Snapshots (PNG,JPG format supported)
As VLC offers instantaneous pause and allows playback in frames, as you can see here. You might need to take a snapshot of either specific frame or an instant paused frame. Guess what? VLC lets you take screenshots as well. You can capture a frame either by pausing the video, or while playbacking video frame-by-frame. To take snapshot more promptly assign a hotkey to snapshot feature from VLC Preferences. Otherwise from Video menu, click Snapshot to capture a screenshot of a frame.

14) Customize Interface 
There are so many features & functions VLC offers which makes it distinctive from others, Among those features, one is interface customization feature. Under View menu, you will find Customize Interface. It allows you to; change menus, buttons, add/delete buttons, change layout of main layout, and change playback controls positions as well.

inerface custom


15) Debug Logging
Want to know what went wrong with Video FPS, codecs you are using, why some feature is not compatible, or why you are encountering lagging and other relevant issues? VLC can tell you about any problem. With it’s intrinsic Debug logging feature, it can inform you about info like; lack of correspondence (in Network), video discrepancy, why feature is not supported or not compatible, which codec is missing, app crash, and erratic A/V halt due to unidentifiable reason. To view log, from View menu, under Add Interlace, click Debug logging.

Continue Reading | comments

Best way to backup your Important Data

Thursday, 18 August 2011

Think what Happened if suddenly your computer stop working and all the important data you had saved GONE FOREVER, All those pictures from your last vacation, your babies photo, the important data your boss needs, Large collection of your Favourite songs which took long years to collect...ALL GONE.
So its very important to backup all your files.

Top Five Ways to Backup Your Files

1) ONLINE BACK UPS.
Online backup, also known as remote backup, is a method of offsite data storage in which files, folders, or the entire contents of a hard drive are regularly backed up on a remote server or computer with a network connection.   
The rationale behind online backup is simple. By frequently/ continuously backing up data on a remote hard drive, With a high-speed Internet connection and a Web browser interface, the remote files and folders appear as if they are stored on an external local hard drive. Encryption and password protection help to ensure privacy and security.
Below are the some Sites which offer online back up service
Idrive.com  - One of the best online data backup options available is IDrive.  It is an online service that offers different paid packages for online data backup. Additionally they have a free evaluation package which provides up to 10 GB of online storage.
ADrive.com - offers 50GB of free online storage and backup for all file types. Store your files with ADrive and access, manage and edit them from any computer.
2) EXTERNAL HARD DRIVE
  
An external hard drive sits outside the main computer.This portable drive allows the user to store information on a hard drive that is not inside the computer, but rests on a tabletop or surface nearby the computer. The external hard drive is connected to the computer via a high-speed interface cable. The interface cable allows the external hard drive to communicate with the computer so that data may be passed back and forth. The most common types of interfaces are USB.
Another advantage of an external hard drive is that it is portable and operates on a plug-and-play basis. Any computer with USB will recognize the external hard drive as a storage device, and assign it a letter to designate it. The drive can then be accessed like a normal internal hard drive.
3) CDs or DVDs
Backing up data with CDs or DVDs is great if you only need to backup a little information (less than 5GB), but if you have much more it is just not convenient. If you decide to backup with CDs or DVDs then this is the stuff you need.
Continue Reading | comments

Reminder about forgotton attachment from Gmail

The reminder comes soon enough. A mere seven minutes after you sent the email including all the promised reports, you get back a quick note: "did you, perhaps, forget to attach...?"
Not soon enough a reminder, you say? So says Gmail. Employ the right wording in your message to promise files ("have attached"), and Gmail can remind you before it delivers the message if you have not, in fact, attached.

Get a Forgotten Attachment Reminder in Gmail

To get an alert from Gmail when you promise a file in your message but fail to attach any files:
  • Remember to include the words
    • "I have attached",
    • "I've attached",
    • "I have included",
    • "I've included",
    • "see the attached" or
    • "attached file"
    when sending attachments.
Continue Reading | comments

Sport

Entertainment

World News

My Blog List

Test

Blog links

Categories

Followers

 
Support : Creating Website | Johny Template | Maskolis | Johny Portal | Johny Magazine | Johny News | Johny Demosite
Copyright © 2011. Knowledge Box - All Rights Reserved
Template Modify by Creating Website Inspired Wordpress Hack
Proudly powered by Blogger